Tuesday, June 30, 2009

The Final Discharge Pictures

Here are the last pictures of my experiments from our Rhap Group playday. I'm sorry but I was having too much fun playing to remember to take pictures of what the others were doing. You'll have to take my word for it that there was other great stuff happening.


This piece started out bright crayon orange. I used some 5-petal flower flower shapes that Jan's husband cut. I think they ended up looking more like starfish, but that's okay. Again I would clamp each petal next time and use a more diluted bleach/water solution.

About the only thing I can draw freehand is a tree so I played with a variety of solid fabrics drawing as many different trees as I could think of. The star of the show is the army green piece that turned a delicious gold. And that's my first ever palm tree, LOL.

Again I want to highly recommend that you invite a group of friends, grab a bunch of cleaning supplies that contain bleach (do NOT use anything containing ammonia as bleach and ammonia produce a toxic gas!) and have at it. Who knows what exciting fabric you will produce?

Lisa

Monday, June 29, 2009

Discharged Stars

Jan's husband was cutting out plexiglas shapes so I asked if he could make something besides circles and squares. He made these fabulous wonky stars!

The fabric on the right is Kona black, but the fabric on the left is a multicolored commercial print. All pieces were accordion folded and clamped on both sides with the wonky stars. I was careful to line up the same points of the non-symmetrical stars. I only clamped them in two places and there was quite a bit of discharge creep (that's a fancy new technical term I just made up) underneath so next time I would put a clamp on each star point. Then they were dunked in the 50/50 water and bleach bucket for a few minutes.

Here is a closeup showing the interesting variety of colors that occurred in a halo effect around each star. Cool, huh?
Lisa

Sunday, June 28, 2009

More Discharge Fun

Again these were both done on Kona solid black fabric.

On this one I placed pieces of torn blue painters tape in random spots. Then I sprayed it using a mildew remover spray that contains bleach. In hindsight I wish that I had sprayed it more because the tape design doesn't show as clearly as I had wished.

This piece was accordion folded in both directions. Once it was a folded square I clamped a square piece of plexiglas on point onto either side. Then it was placed in a 50/50 solution of bleach and water for about 3 minutes. Next time I would make the bleach solution less powerful so that it would work more slowly. That way I think I would have better control of the results.

Lisa

Saturday, June 27, 2009

Discharge Fun

When the Rhap Group was here on Monday we experimented with bleach and cleaners containing bleach. Here are a couple of my pieces from that day.

Originally these were both Kona solid black. On this piece I pole wrapped it on the diagonal, scrunched it up and tied it in place with thread (I couldn't find any string). I painted Soft Scrub on the uppermost folds. When it had visibly changed color I slipped it off the end of the pole and dunked it in water to stop the action. We had several water buckets set up to keep dunking it in cleaner and cleaner water. Then we rinsed it in vinegar and water followed by clean water. The last step for me was a wash in the washing machine using Synthropol.

The flower was one of those rubbing plates. Jan got the brilliant idea to paint the Soft Scrub on with a foam brush, then we pressed it onto the fabric. Cool, huh? I put a little too much Soft Scrub so mine is messier than hers. Definitely a learning curve.
And before you write to tell me about Anti-Chlor, I know, I'm going to order some in my next Dharma order, just didn't have any on hand. That said I have pieces I did in 1997 with the same products we used this time and they are still fine, no holes.
I highly recommend play day. Get out some cleaning products and some solid-ish fabrics, set up a workstation or two outside, invite your friends and have at it!

Lisa

Friday, June 26, 2009

Curves Totebag

Here is another guild workshop sample recently finished. The reason there are 2 totebags is because the technique makes 2 sets of curves and I wouldn't want to waste any!

On this totebag I worked from the lightest color for the background to the darkest color at the top.


And this one is the other way: darkest for the background and lightest for the top.
I expected to like the dark at the bottom better since the "weight" of the composition is at the bottom, but I like the light at the bottom better. I haven't figured out why this is...
So if you're interested in having me come to your guild for a fashion show this is a new option for an accompanying guild workshop. Of course there is a jacket using the same technique for those so inclined :-)
Lisa

Thursday, June 25, 2009

Free Motion Applique Totebag Done

I finished the free motion applique totebag, but I think I'll have to make another one. While this one is gorgeous in person, the free motion stitching doesn't show well enough in a photograph and since it's for my website... The next one will have stronger colors and BLACK stitching! Even the closeup is hard to see. Oh well, back to the drawing board, I mean the sewing machine!

Lisa

Wednesday, June 24, 2009

June 22 Quickie Quilt

As I mentioned last week, each Monday (time permitting) I want to make a quickie quilt using some of the gelatin prints, etc that I have been accumulating. After all, it's hard to justify making more when I don't use them, even if they are too much fun to make.

Here is this week's quickie quilt. I sliced one of the gelatin prints (navy background with copper and gold Liquitex paint using coreopsis leaves) and inserted a rust colored hand-dyed. I put a narrow border of a funky sheer I found in my stash (after taming it with a black fusible interfacing) and followed that with the original navy fabric. I kept the quilting minimal after overdoing it last week :-) with some stitch in the ditch in the center and 2 trees in the border free motion quilted using gold thread.
I ended up cutting it a bit wonky because there was a blob of pink and purple on the lower left corner which I found distracting. I decided the emphasize the angle even more and I like it!
As for new techniques, I've done inserts before, but I had been wanting to play around with inserting tree branches to see if I liked the results enough to do a larger piece. My decision is no because I think it's too linear for my taste, even if I split it up with more and more branches, twigs etc. Lesson learned without a huge outlay of time or fabric.
Lisa

Tuesday, June 23, 2009

Woven Quilts all Finished!

Sorry to be away so long. We lost our hot water heater which necessitated moving a lot of things and took up a lot of time.

The Rhap Group met here on Monday. I was thrilled to see the completed quilt tops from our last project: Simply Stunning Woven Quilts
Here is Jan's quilt complete with broderie perse flowers.

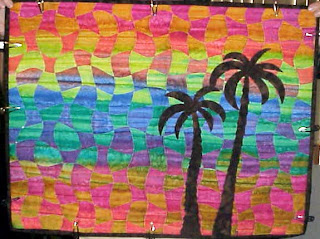
And here is Patty's quilt with palm tree silhouettes.

And this is Jerre's quilt with broderie perse flowers, couched stems and raw edge double sided fused leaves.
After show and tell we went to my backyard and enjoyed a playday with products containing bleach. Photos to come soon!
Lisa

Thursday, June 18, 2009

Free Motion Applique

I've been working with free motion applique for many years now and a good friend (thanks Christina!) suggested that I should start teaching it. I have a number of examples on my jackets, but I like the have a simpler project for people who don't want to invest the time in a large project. This will be the front side of a totebag.

Here is the basic design, featuring fabrics fused in place using WonderUnder. Then I free motion stitched to further secure the edges using a matching rayon thread.

Here is a closeup of the stitching. I tried to tweak the colors so the stitching would show more. Let me just say it shows up more and looks better in person.


Then I discovered that the back shows the stitching even better since I use a matching color in the bobbin. (Maybe I should make it a reversible totebag. That's probably overkill...) Next step is to finish it into a totebag.
Lisa

Monday, June 15, 2009

Monday Mini Quilt

I've decided to actually DO something with the gelatin prints I made back in January. They've been sitting in a pile for ages gathering dust. I grabbed the top one and gave myself permission to just play. No stress, no purpose and I had to finish it today.

The one I worked on is in the bottom left in this photo.
And here is the result.
I'm still not sure which side is up, but it's done and I tried something new that I'd never tried before: free motion zigzag. I'm hoping to do this once a week, if possible on Mondays.
Lisa

Sunday, June 14, 2009

Photoshopped Daisy Pictures

So as promised here are some of the pictures I played with in Photoshop yesterday.

Just so you have a frame of reference here is the original picture. For each of the following pictures there is only one change made to the original. Imagine how much cooler to make multiple changes!
Glowing edges

Stamp

Polarized
Paint daubs
Find edges
Of course my next step is to develop a jacket to showcase some altered pictures. The size of a page will limit what I do for now (I haven't learned tiling yet). Hmmm... off to the drawing board!
Lisa

Saturday, June 13, 2009

Photoshop Class

I didn't get any sewing done today, but I did something else that was lots of fun! I took a class on Photoshop for Quilters at Bits and Pieces. It was too too much fun! We learned how to use Photoshop Elements (I bought the program for the class and it is so worth the money, especially since it was on sale with a rebate!) from the very beginning.

We learned how to crop, how to lasso, we started building layers and choosing the background colors based on the colors of the focal piece. I played around with some of the way cool filters, etc. I wish I could show you, but for some reason my laptop is being difficult and won't send any emails right now. Maybe tomorrow. I'm off to play some more. I highly recommend this class :-)

Lisa

Friday, June 12, 2009

A gift for me

My students from the Bits and Pieces class gave me this beautiful quilt in class on Wednesday. Each leaf has a nice message written by my students. Sherrie Smith quilted it and did a beautiful job. I feel so lucky to have had so many wonderful students. And it looks wonderful on my new couch. What a wonderful surprise!

Lisa

Thursday, June 11, 2009

Last Sharpie Piece

So I'm having too much fun with the Sharpies and couldn't resist one more piece. Since I did the cool colors I had to give the hot colors equal time.

I could see making this one into the closeup of a flower center with the right quilting lines. Will I do it? Probably not, but it was fun to make!

Lisa

Wednesday, June 10, 2009

Sharpie Orientation Experiment

I wanted to see what would happen when I colored similar designs but held them in different orientations when adding the rubbing alcohol. Here are the results.

This piece was pinned to a clothesline with the stripes running vertically. Notice how the colors did not run together as much.

This piece was pinned to the clothesline with the stripes running in a horizontal orientation. There was a lot more blending of the colors. If I was planning this in the future I'd have my lighter brighter colors at the top. Some of the lighter colors in the bottom half were obliterated.
In all I think either of these would work for a sunset and the bottom one would be especially good for water reflecting a sunset.
Lisa

Tuesday, June 09, 2009

My Woven Quilt

Remember how I said that my woven piece wasn't like the others and I didn't read the directions in the book? Well here it is. To give you an idea of the scale, the flowers are perhaps 4 inches across. The tendrils are hand couched yarn and the "stems" are raw edged and buttonhole stitched.

It was a fun quickie project. I have so many irons in the fire right now that I knew I didn't have time for something big, but I still learned and explored the process, creating something of my very own.

Lisa

Monday, June 08, 2009

More Playtime with Sharpies

I'm not sure why this Sharpie thing is so appealing. Perhaps it's because I get to go back the childhood joy of coloring? Maybe it's just because the table is set up in front of the tv so it gives me something to do while I watch.

I played with polka dots. These were especially interesting how the different colors ran. On the piece on the left, if you look at the upper right you will notice a small green dot surrounded by a yellow green circle. That was because the yellow ran while the rest of the green did not. The purple reacted similarly. The pieces on the right are the plain pieces of fabric I put underneath when I added the alcohol. The polka dots one was boring but check out the pansy! I like that one better than the original!
And the daisy-like flower. The one problem I had was that the underneath fabric wasn't in perfect contact with the upper piece. I'm working on grass and it's not a firm surface. I don't want to stain my patio or anything inside the house. And the foam core board I used the first time took so much color I'm afraid it will color anything new I put on top. Perhaps plastic...

My next experiment will be hanging the fabric and pouring the alcohol down it like Robbi Joy Eklow does with her dyes. I want to try stripes but differ the angles they're hung at to see if I really get different designs. How much is the color really moving?
Lisa

Sunday, June 07, 2009

More Sharpie Experiments

After letting my Sharpie/treated with alcohol fabric set for a few days I heat set it with an iron. (note of caution: for some reason the yellow transferred itself to my ironing board cover which, fortunately, was just a piece of muslin, and no I didn't use steam.) Then I tore the piece in half and washed one half. The results are below. The one on the left was washed and the one on the right was not.

I think you'll agree that there was some color loss. Enough that I wouldn't recommend washing. That said I think that most of us do not wash our art quilts and I do not wash my jackets. I will have to try a dry cleaning experiment one of these days just to see what happens. Unless someone out there in cyberspace has already tried it?

I decided to make a color chart of each color Sharpie that I own. I wrote the names with a Micron pigma pen. Then I clothespinned it sideways to a line in my backyard and dripped alcohol on each color with an eyedropper. It was interesting to see which colors ran the most (there were definitely differences!) and which ones separated out into 2 or more colors. Another interesting note was that occasionally the alcohol ran into the pigma pen words and they did NOT run.
I've been playing around for an idea for a background on a small wall quilt and this was my first attempt. I wasn't happy with it because the values were too different. There was too much light and I wanted it to read "smoother".


So I tried again with just dark colors and am much happier now. This sort of work is great while watching those mindless tv shows that seem to be in abundance this summer. I can't wait until Project Runway starts again: August 20!

Another experiment will take quite a bit more time. I have the first washed and unwashed pieces pinned to the wall in my studio. They are not in direct light, but there's plenty of ambient light in the room. I have matched the colors to the best of my ability to some embroidery floss and will check the colors for fading in September. Remind me, 'kay?
Lisa

Saturday, June 06, 2009

Rhap Group Meeting

Our "Rhap Group" met last week and I actually remembered to bring my camera! (If it was a lighter newer model I'd carry it all the time, but it's an old dinosaur that weighs a ton. That's a hint for my husband...)

We have been working from the book "Simply Stunning Woven Quilts: 11 Easy Techniques, Great Results" by Anna Faustino. Here are some pictures I took of other member's work.

Jerre's woven quilt in process.

Jan's woven quilt in process

And Jan made her rhapsody quilt into a pillow! Isn't it beautiful?! I love this idea :-)
My woven piece is finished, but you'll have to wait for another day to see it. Let's just let it suffice to say that I didn't follow the directions in the book ;-)
Lisa

Friday, June 05, 2009

Up

My daughter and I went to see Up at the movies and I was thoroughly charmed. It was funny and sad and different from our usual movie. I especially enjoyed the way it dealt with the elderly and following your dreams. And the short beforehand was charming, too! Go see it :-)

Lisa

Thursday, June 04, 2009

Student Work

One of the nicest surprises is getting email wih pictures from former students. Marcela made these beach towel bag as a gift :-)


Tuesday, June 02, 2009

Cats

Have you ever tried to take a picture of a cat? It's virtually impossible! As soon as the camera comes out they become shy. Cushy (Cushman really) is a pound cat and is approximately 15-16 years old. Tchai (short for Tchaikovsky) is a Ragdoll and is 10.

Cushy was looking at me just before I snapped the picture...

The only real shot I got of him. How about that long suffering look he's giving me?

Tchai was even harder! He was either too close

or looking down. I swear he was looking when I snapped the picture!

I sort of got him here and that will have to do.
Lisa